Misha
Site Founder
Welcome folks to the guide to invasion basics, developed by myself and longtime privateer-in-arms, @Jawn. With all the new folk in the community, we sat down and completed the entirety of this guide within the last 24 Hours, compared to the few weeks' time that we were originally planning to work the details of this guide out.
That being said, let's get into the guide by first listing the five key points that we'll be covering, which are equally as substantial in the (currently) accessible Tortuga and Port Royal Invasions as they will be in the future Padres Del Fuego invasion.
How Invasions Work
Invasions present themselves at random and are indicated by a notification on the left side of the screen, as well as a very distinct change in the sky, turning green with Jolly Roger's face slowly showing in the moon. Pirates preparing to defend the oncoming invasion will have 30 minutes to prepare from and head to the specified island from the time that the notification is shown. There will always be AT MINIMUM a 3 Hour resting period between invasions.
(NOTE: Invasions will always begin at the top of the following hour (Invasion notified at 6:30 -> Starts at 7:00.)
Your job is to defend the barricades which are located at a number of points on the defending island, marked by a line of varying orange triangles shown on your F8 Map, as well as the main objective building (Faithful Bride Tavern or Governer's Mansion.) These barricades act as a hard stop for present invaders and will be the primary target of their focus when they have reached it. These barricades are a great choke point to pick off invaders in groups with relative ease.
It is also worth noting that these Barricades provide an EXP Bonus at the end of an invasion depending on if they are still standing or not.
Jolly Roger's Army is divided up into a fighting force of 7 individual waves, known as brigades. Each of these forces being tougher than the last and introducing new enemies to the mix, as well as increasing the health and attack damage of all present enemies in that wave.
Waves are "Defeated" by removing all hostile enemies from the battlefield. Even a single opponent left standing will not allow the wave to progress!

After 7 waves, or if all the barricades are totaled, Jolly Roger himself will emerge from the beaches of the invading island to take ground.
A couple key thing to keep in mind:
That being said, let's get into the guide by first listing the five key points that we'll be covering, which are equally as substantial in the (currently) accessible Tortuga and Port Royal Invasions as they will be in the future Padres Del Fuego invasion.
How Invasions Work
Invasions present themselves at random and are indicated by a notification on the left side of the screen, as well as a very distinct change in the sky, turning green with Jolly Roger's face slowly showing in the moon. Pirates preparing to defend the oncoming invasion will have 30 minutes to prepare from and head to the specified island from the time that the notification is shown. There will always be AT MINIMUM a 3 Hour resting period between invasions.
(NOTE: Invasions will always begin at the top of the following hour (Invasion notified at 6:30 -> Starts at 7:00.)
Your job is to defend the barricades which are located at a number of points on the defending island, marked by a line of varying orange triangles shown on your F8 Map, as well as the main objective building (Faithful Bride Tavern or Governer's Mansion.) These barricades act as a hard stop for present invaders and will be the primary target of their focus when they have reached it. These barricades are a great choke point to pick off invaders in groups with relative ease.
It is also worth noting that these Barricades provide an EXP Bonus at the end of an invasion depending on if they are still standing or not.
Jolly Roger's Army is divided up into a fighting force of 7 individual waves, known as brigades. Each of these forces being tougher than the last and introducing new enemies to the mix, as well as increasing the health and attack damage of all present enemies in that wave.
Waves are "Defeated" by removing all hostile enemies from the battlefield. Even a single opponent left standing will not allow the wave to progress!
After 7 waves, or if all the barricades are totaled, Jolly Roger himself will emerge from the beaches of the invading island to take ground.
A couple key thing to keep in mind:
- Jolly Roger is primarily a Voodoo User, and can attack from afar!
- Being labeled as the toughest opponent in the Caribbean, he is Lv. ??? with a staggering 500,000 HP!
- Roger doesn't discriminate in targets, he can delete barricades in mere seconds, as well as nearby pirates.
- Roger's main attacks include an enhanced version of Grave Shackles, Wither, & Desolation.
Things to Avoid

Yeah.. these bad boys. These bombers have absolutely zero regard for anybody's safety and can be fairly lethal, even to a maxed pirate. Found as early as wave two or three of the invasion, these skeletons upon being killed, or reaching a barricade, will detonate themselves, dealing massive amounts of damage and is enough to often times take down a Lv. 50 Pirate with maximum health upgrades!
Your best bet against these monstrosities is to gain a substantial bit of distance and take them down with explosives of your own, or a long ranged variant of a gun.
NOTE: When attempting to dispatch a Keg Runner, make sure to take it down AFTER nearby pirates have made some distance.

It is hard to not recommend the base style of gameplay when combatting the game's primary foe, however, we have a very good reason behind it. While it may be tempting to charge upon multiple skeletons and slash at them with your broadsword, this can quickly backfire.
Waves are typically bunched together, and striking nearby enemies with a sword (with how aggro currently functions) will most likely cause them to focus on you. Depending on the wave, this can be extremely difficult to recover from in regards to health and can lead to becoming knocked out by other sources of damage rather quickly.

During an invasion, things can become chaotic very quickly, but it is important to remember that all areas of the island are necessary to defend, and leaving a weak link can spell trouble for later rounds when you begin to rely on the health of the barricades to suck up some of the monumental damage that is being outputted.
During an invasion, it is smart to gather a crew to inform members on the other end of the island of the status of your side's barricades and efficiency with taking down enemies. The same is to be noted for overcrowding a beach, which can not only cause invasions to run longer, but in most instances with uncoordinated groups, can create a problem where players begin to try and rotate between barricades without saying anything, creating a firepower lapse on one end.

Our Reasoning
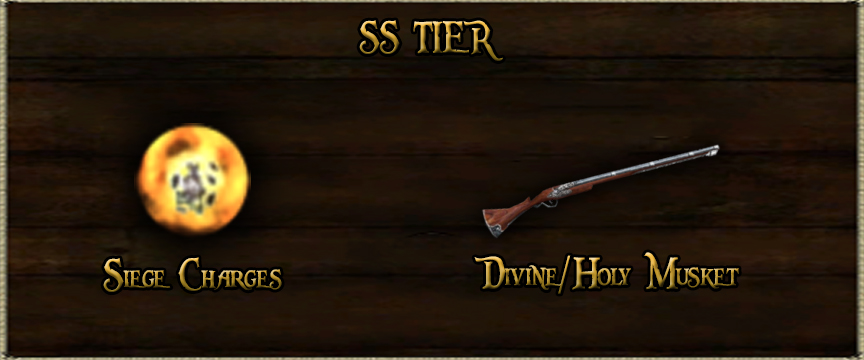
SS
Siege Charges are the single most powerful weapons in the game, unlocked at Level 20 in Grenade Skills and can kill huge hoards almost instantly with it's ridiculously large blast radius and phenomenal damage numbers.
On the contrary, Divine/Holy Muskets excel in picking off single targets at a time, and are especially good at wiping out Keg Runners. The primary drawbacks of these weapons is that they lose 100% Effectiveness at close range, and are not able to be fired. Keep your opponents at a distance!
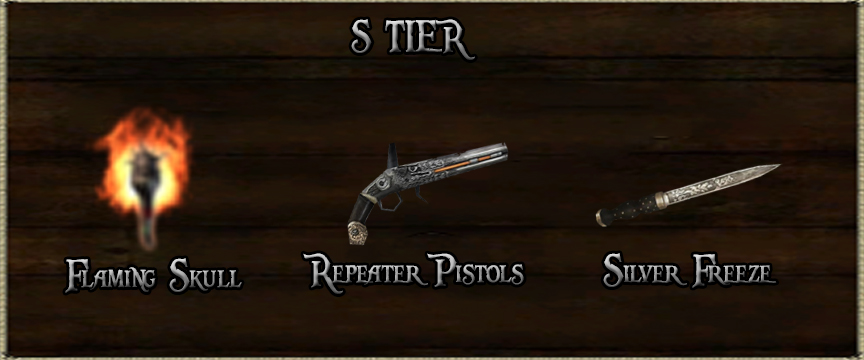
S
Flaming Skull is an incredibly powerful straight line attack for the Voodoo Staff, capable of burning down entire lines of enemies after only two to three casts. Drawbacks to this ability are that it is unlocked It is slower than Siege Charges, which is why it is here.
Repeater Pistols seem like an odd pick, but they are nimble, easy to use and obtain, and they shred the health of most non-boss enemies in the game. They are great for shredding entire waves of undead, and can be switched to handle Stumps in a flash.
(It is recommended to use a Repeater with either a Silver Shot boost, or infinite Steel Shot.)
Finally, in the S Tier lies Silver Freeze, an underappreciated Legendary with the ability to halt an entire wave in it's tracks. It's Legendary ability can even stop Jolly Roger for a couple seconds! It is a great utility to have on-hand to be able to take a breather if needed.
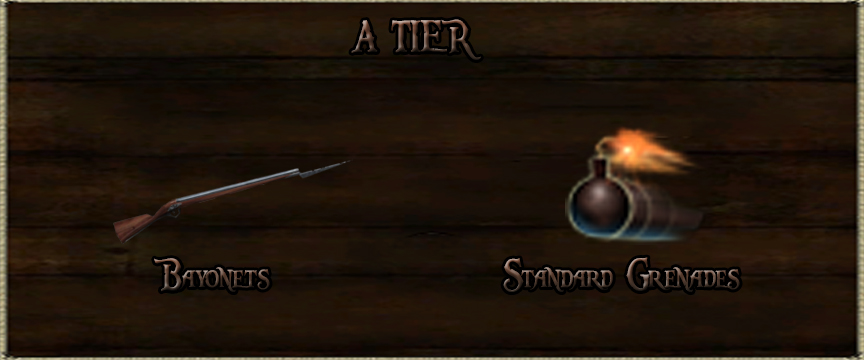
A
Bayonets, like Muskets, are very capable at dealing with long range targets. However, what Bayonets have over Muskets is the ability to deal some damage in close range. However, due to the lack of lethality to this special perk, and to the nature of the poor bonuses of most bayonets, this weapon has landed at the A Tier.
Explosives, the first Grenade unlocked, are a great tool at clearing off stragglers and a great method of ammo conservation as to make sure you don't run out of Siege Charges too fast. They are however weaker than Sieges, and effect a much smaller radius, which causes them to fall short to their Level 20 Counterparts.
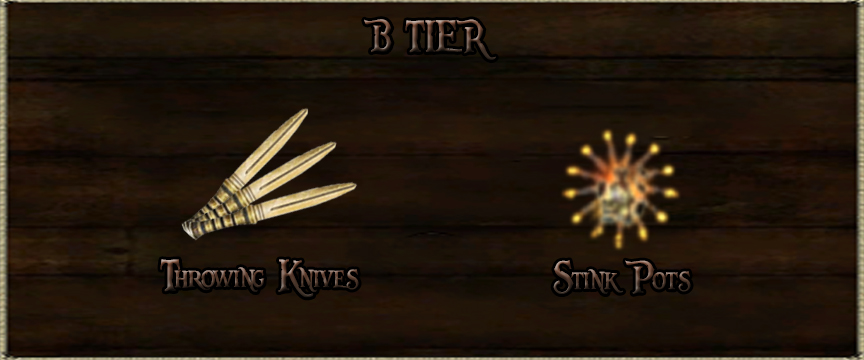
B
Throwing Knives are a great secondary tool to have on-hand in earlier waves as to preserve consumables and ammunition until they are truly needed. However, without any significant damage bonuses, Throwing Knives are the weakest ranged weapon in the game, and can only deal minute amounts of damage to opponents at range.
Stink Pots are essentially the poor-man's Siege Charges. Unlocked at Level 2, these consumable grenades have a surprisingly large area, and with a maximum Ammo Pouch hold DOUBLE the amount of bombs that Siege Charges do. However, with these two perks comes the drawback-- It's damage. Siege Charges are the weakest damaging consumable grenade, and are only saved in that they do a decent amount of Overtime damage combined with a Slowing effect.
C+
Melee weapons, as stated above, are highly discouraged due to the amount of damage that can be taken in the midst of Invasion forces.
Voodoo Dolls, while not atrocious for the Healer role, should not be used in Invasions at any point aside from casting a Curse on tougher opponents. Low damage per second output combined with long recharge times creates an entire span of time where you are unable to attack, defend yourself, etc.
(It should be noted that the Soulweaver is the one exception to this, and could potentially be rated in B Tier if it weren't due to poor recharge rates.)
Daggers are just about the worst choice for Invasion forces, save from Jolly Roger due to the fact that he does not react to backstabs. Daggers in large groups of enemies have always been a generally bad idea, but when the potential of being one-shotted by a plethora of opponents presents an added risk, it is advised to steer clear of these weapons at any and all chances possible.
Conclusion
Invasions are comically fun, and are a staple of Disney's progress with the Pirates of the Caribbean Online game. They can be either hilariously fun to play or aggravating as anything to deal with. Regardless of opinion though, I hope that this guide to the basics were able to teach everyone a little something in how to deal with the largest enemy swarm in POTCO/TLOPO's gameplay history to date!
Edits
v1.01 - Revised the artwork for the Guide to make more sense to what is being displayed, and added extra information to their tier list as to explain our standing.
Last edited:
")